Tiny Dots for Tiny Tots!

*photo by Kelly Jones

*photo by Kelly Jones

There’s a brand new loom knitting publication freshly released by our very own Kelly Jones! 😀  I was lucky enough to have gotten a little bit of a pre-peek into it’s pages and I have to say, oh what fun!

The idea is simple.  Grab a loom.  Make a dot.  Add the extras to see it transform before your very eyes into a yarnie creature full of spunky personality! 🙂

Kelly has included designs for 20 of these sweet little handfuls of fun…from bumble bees and turtles, to lions and tigers and bears, oh my!  The designs are such that you can stick to her original creations exactly, or feel free to easily embellish your critters any way you wish, making the possibilities for new fibery friends pretty much endless.

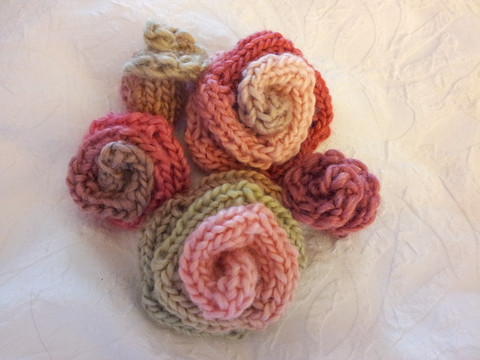
Here are a few of her darling little creations (*photos by Kelly Jones):

Aren’t they so cute?!  Do you see all the possibilities for different looks already?  Oh, what fibery fun! 😀  (…I think the mouse might be my favorite here. He is heart-swooning adorable!)

Here’s the Owl from Tiny Dots for Tiny Tots:

*photo by Kelly Jones

*photo by Kelly Jones

How fun is he?

I just love his little expression… so inquisitive, yet somehow all-knowing.

He looks into my soul. 😉

This was the little character that I decided to play with while discovering Kelly’s book.

I also decided to use a bit more color.

And thicker yarn.

Once I got going, I decided to add a little  embellishment to his eyes.

Oh what the hey!  Why not add a little funky tuft at the top of his head?

Here he is. 🙂

He’s kind of a wild ace… and a little bit crazy.

His friends like to egg him on in deep discussions, just to have the pleasure of seeing his huge eyes squint and his wings flap while he thinks real hard.

When he brings his little cousin, then the fun truly begins…

They get to discussing all sorts of things, from politics to how their latest culinary endeavors turned out.

They’re a fun pair to be around. 🙂

While the bigger cousin squints his eyes and flaps his ears during deep thoughts,

the smaller cousin hops up and down and and a tiny hint of whistle can be heard through his excited beak.

Aren’t they quite a pair? 🙂

I just love them!

I love how they came to be from a wonderful pattern that was easy to understand and that let me have a little bit of fun with it.

One thing about the book, Tiny Dots for Tiny Tots is that it is an excellent resource for learning how to use the KISS Looms.  All the little characters in the book were actually designed on a KISS small gauge adjustable loom.  There are terrific tutorials and information about these looms included in the beginning of the book, so that you can use it as an excellent manual to learn how to use an innovative type of loom.  Read all about them here! 🙂

lil guyEven though the patterns were created on the KISS, you can also create them on looms of a similar gauge.  As an example of this, I created the Big Cousin Owl by using the KISS small gauge, in exactly the way the pattern was written (except for the small changes mentioned above, lol).  The ‘lil Cousin Owl was created using an extra small gauge loom of a different brand.  I used the same instructions, but because of the smaller gauge, he came out a smaller owl.

See how there’s even more room for discovery here?  Critters of all different sizes are possible too! 😀

Talk to the back...

Pop on over and order your copy today!  There’s even a special deal if you purchase the book and throw in the KISS loom used for all these critters…how cool is that?!

Now onto that mouse…I need to meet him in person…maybe my kitties do too, haha! 😉

Bethany~

Posted in Books, Crafting, Family Fun, Kids, Knitting, Loom Knitting, Looming Patterns, Looms, New Projects, Product Review | 4 Comments

New Beginnings for 2013!

This is what we're up to our necks in right now, lol!

This is what we’re up to our necks in right now, lol!

Yep…it’s that time again!

We’re picking up roots once more.

We’re up to our necks in boxes and dust bunnies.

Hubby has an awesome new job opportunity, and it all just felt like the right thing to embark upon and just at that right time in our lives. 🙂

How’s this for our new digs?  Pretty gorgeous, right?

http://www.lovelaconner.com/

I think it has a lot of possibilities, don’t you?  I’ve heard the farmers markets in the very nearby Mount Vernon are amazing too…can’t wait!

PS…We’ll be removing our Tidbits & Things inventory from it’s current location at Pip & Lola’s, at the Freighthouse Square in Tacoma, WA.  This will be happening sometime before this next weekend.  If you’ve been interested in stopping by and purchasing goodies from our line, then now’s the time to snatch it before it’s all gone! 😉  We will be keeping our eyes peeled to the new possibilities for another physical business location as we settle into our new hometown.

Cheers and lots of happy days to you!

Bethany~

Posted in Family Fun, Goals, Growing Up, Life, Loom Knitting, Tidbits & Things | Tagged , , , , , , , , , | 10 Comments

A little bit of early Spring! (Alternate Leaf Pattern for a Lovely Rose, too!)

Roses Bouquet! :)We’ve recently been working on brightening up our Gettin’ It Pegged! Yahoo Group with loom knit flowers and sweet little hearts.  I have worked up quite a lovely little bouquet using Brenda Myers’ Felted Roses pattern.  I just wanted to share with you how I modified the pattern just a bit to be able to place a stem. 🙂

In the Brenda’s pattern, she describes how to create two leaves for each flower and then to stitch them on… which is fantastic for leaving the rose flat on a bag or pin, etc. Because I wanted the roses to stand individually, I did the following method to create that bottom green section that connects the flower to the stem…

Roses Bouquet...what the back looks like~Loom: I used the smallest setting of the MS Loom (the two corner pieces used alone), and the large gauge pegs set every other one, so that there were 10 pegs on the loom. The same can be accomplished with a long Knifty Knitter Loom and Loom Clips.

  • Drawstring CO all pegs in the round.
  • Rows 1-6: flat knit all pegs (For my smaller buds, instructions found in the Felted Rosette Handbag, link below,  I worked 5 rows)
  • BBO the 10th peg by knitting the peg 1, moving the loop to peg 10, and KO. Move the loop back to peg 1. Peg 10 will now be empty. (For my smaller buds, on the last round, I began my BBO at peg 7 and continued to peg 10. This left 6 pegs with loops.)
  • Follow Brenda’s direction exactly for creating the leaf…except that you will already be cast on, so no need to work the beginning step of a Drawstring CO. 😉  (For my smaller buds, I worked the same instructions, but using only the remaining 6 pegs and I only worked a total of 10 rows, rather than the called for 12.)
  • Once your leaf is done and you have removed your greenery from the loom, place your stem (I used some popsicle sticks wrapped in floral tape, but a wrapped or painted dowel or wrapped wire would work as well.) up inside the cast on edge so that there is still enough room at the top opening to place the gathered bottom edge of the completed rose down into.
  • Pull the CO tail snugly against the stem and knot. Do NOT cut!
  • Thread the tail on a yarn needle and bring it invisibly up through the stitches to the top opening. Stitch around the opening to secure the rose in place.
  • Weave in all ends.
  • Enjoy!

Roses Bouquet...what the underside front looks like~I think this method would also look really great with a Lily of the Valley type of flower, or an iris! 🙂  Hope you enjoy this little option for creating loomy gardens this spring!

Roses Bouquet...all the different sizes~**Note about the different sizes of roses in the Bouquet: I used Brenda Myer’s Felted Rose pattern exactly for the larger two, then I used the same pattern with just 6 pegs for the smaller rose. The two rosebuds are created by using the same method as with the Felted Rosette Handbag (I used 16 pegs and worked 10 rows before using the Dereased BO) 🙂

Below are some of the bright and cheery patterns we’ve been using for our Loom Along, if you’d like to enjoy a little bit of early spring growing from your looms as well:

Felted Roses: http://loomlady.blogspot.com/2007/05/felted-roses.html

Felted Rosette: (video tutorial) https://gettinitpegged.com/twisted-stitches/

(written instructions included in Felted Rosette Handbag)

http://gettinitpegged.com/freebies/

Pansies: http://loomlady.blogspot.com/2011/03/pansies.html

Loopy Flowers: http://loomlady.blogspot.com/2012/06/lovely-loopy-flowers.html

Blooming Bookmarks, Lady Bug Pincushions, Shellies:

http://guppylovesshark.wordpress.com/free-patterns/

Little Loom Knit Hearts:
http://loomlady.blogspot.com/2012/02/little-loom-knit-hearts.html

Double Hearts:
http://loomlady.blogspot.com/2008/02/heres-my-heart.html

Swirly HeartHappy Heartfelt Looming!

Bethany~

Posted in Crafting, Free Loom Patterns, Holidays, Knitting, Loom Alongs, Loom Knitter's Chat Clique, Loom Knitting, Looming Patterns, Looms, New Projects, Product Review, Tutorials | Tagged , , , , , , , , , , , | 4 Comments