
Some of you out there may remember that I have had a recurring battle fascination with spiders. It all started when we lived in a house that was a veritable highway bypass for aggressive house spiders, a breed of spiders that make you want to don the strongest of armor and go into battle, scouring every inch for those suckers before you feel any sort of relief. My own relief came when we actually moved from that house, lol. Welllllll, not quite, as I’m sure we took some hitchhikers along with us and we still to this day find some of these guys roaming the garage, or occasionally, the house.
 I’m not so paranoid now, though. I’ve learned how to deal with their inevitable autumn re-occurrence. Part of that process has been exploring how to make them seem cute by having their yarnie counterparts dangling around near Halloween, or by learning all I can about identifying them (there’s power in knowledge, right? lol).
Well, I haven’t stopped my therapy, haha! I had been planning on doing a post all about making bobbles for Stitchology at the KB Blog and I ended up having a dream one night about how to make those bobbles into spiders. It’s a pretty good idea, too! Sometimes my crazy brain does things like that in my sleep, lol. Anyway…the very next day I spotted this from Kitterly and my mind went zinging with the possibilities! It wasn’t my dream bobble idea (which I still want to do!), but it was so so cute, and still involved bobbles, so of course I had to figure out a similar loomy version. *Please note that I did not look at the pattern at all, just figured out my own method of making these types of spiders after having looked at the picture for inspiration. 😉 I do highly recommend trying the Kitterly pattern for those needle knitters out there who need a little spider therapy of their own. 🙂
So, without further preamble, here are the instructions to make the repeating stitch pattern, the 8″ x 8″ square (for those of you following along during Stitchology 😉 ), and a couple videos thrown in for good measure! Happy Spooky Looming!

Dangling Spider Stitch for Knitting Looms
by Bethany Dailey, October 2017
Special Stitch Instructions
When the pattern uses the term “knit” or “k”, please use the true knit stitch or the u-stitch, not the e-wrap, unless otherwise stated.
Abbreviations
K,k: knit
P,p: purl
KO: knit off (lift bottom loop(s) over top loop and completely over the top of the peg)
WY: working yarn
HH: half hitch (create a loop with WY by twisting in opposite way than when making an EW and place on peg. The WY will be coming from underneath the twist rather than on top.)
rep: repeat.
EW: e-wrap stitch.
S1, s1: slip one stitch (don’t work the stitch, simply skip this peg, and carry the working yarn behind peg to the back of the work.)
(SWYF) x5 directly translates to: Slip With Working Yarn in Front 5 times. This simply means that the next 5 pegs will not be worked, but will have the working yarn (WY) carried to the front of the work. To do this, simply remove the loop already on the peg, slip the WY in front of the work and behind the peg, then replace the held loop back onto the peg. Repeat for the next 4 pegs in line.
*Note: another easy way to work a SWYF is to begin to work a purl stitch, but instead of lifting the original loop off the peg and placing the new loop on the peg as you do when purling, simply KO the new loop, leaving the original one in place. Pull gently to free the WY, which will now be between the peg and the front of the work.
Steps to Create a Bobble (Bobbles can be worked going in either direction on the loom…Simply number the bobble pegs 1-3 in the order they are worked in the first bobble step.):
Step 1: k3
Step 2: move the loop from peg 1 to peg 2. Move the loop from peg 3 also to peg 2. KO 2 loops over 1 on peg 2.
Step 3: HH onto peg 3, k peg 2, HH onto peg 1.
Step 4: (k3) repeat 3 times, will end on peg 3.
Step 5: move the loop from peg 1 to peg 2. Move the loop from peg 3 also to peg 2. KO 2 loops over 1 on peg 2.
Step 6: reach down at the back side of the work and pull up the 3 loops from the base of the bobble that were knit in Step 1 and place them back onto pegs 1-3.
Step 7: WY will be coming from peg 2. K peg 3. Continue with remainder of row.
Step 8: Knit next row of pattern, KO 2 loops over 1 on peg 2 of bobble.
Video for making a Bobble for your easy reference:
Chart Key for Repeating Pattern Rows

Dangling Spider Repeating Pattern Rows
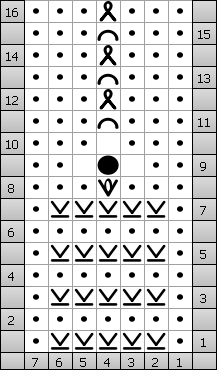
To work this pattern in the round, such as for a hat, use the Repeating Pattern Rows chart, and make sure to read it from right to left for each row, rather than alternating sides each time. Also, cast onto your loom in a clockwise direction, using a number of pegs that is divisible by 7—the number of stitches required for each pattern repeat.
Working as a flat panel (Cast on from left to right/counter clockwise a number divisible by 7. Begin 1st Row from right to left/clockwise):
Rows 1-7: Repeat the following 2 row pattern:
Row A:*p1, (SWYF) x 5, p1, rep from * to end.
Row B: purl all sts.
Row 8:
Peg by peg breakdown:
Pegs 1-3: purl.
Peg 4:
- Temporarily remove the loop from peg 4 and hold.
- Carefully pull up all 4 strands of yarn travelling across the front of the work up onto peg 4 in order.
- Replace the held loop. There will now be 5 loops on peg 4, but ignore the 4 pulled up strands for now.
- EW peg 4 and KO the 2nd loop only (while ignoring the other 4). Repeat 2 more times to create a tiny bobble.
- Reach down at the back side of the work and pull up the loop from the stitch just below the first EW stitch and place it back onto peg 4. KO.
- KO the 4 pulled up loops.
Pegs 5-7: purl.
Row 9: p2, create bobble, p2.
Row 10: p3, KO 2 over 1 on peg 4, p3.
Rows 11-16: Repeat the following 2 row pattern:
Row C: p3, s1, p3.
Row D: p3, EW1, p3.
Rows 11-16+: Repeat Rows as desired for length of spider web.
Video for the above Repeating Pattern Rows:
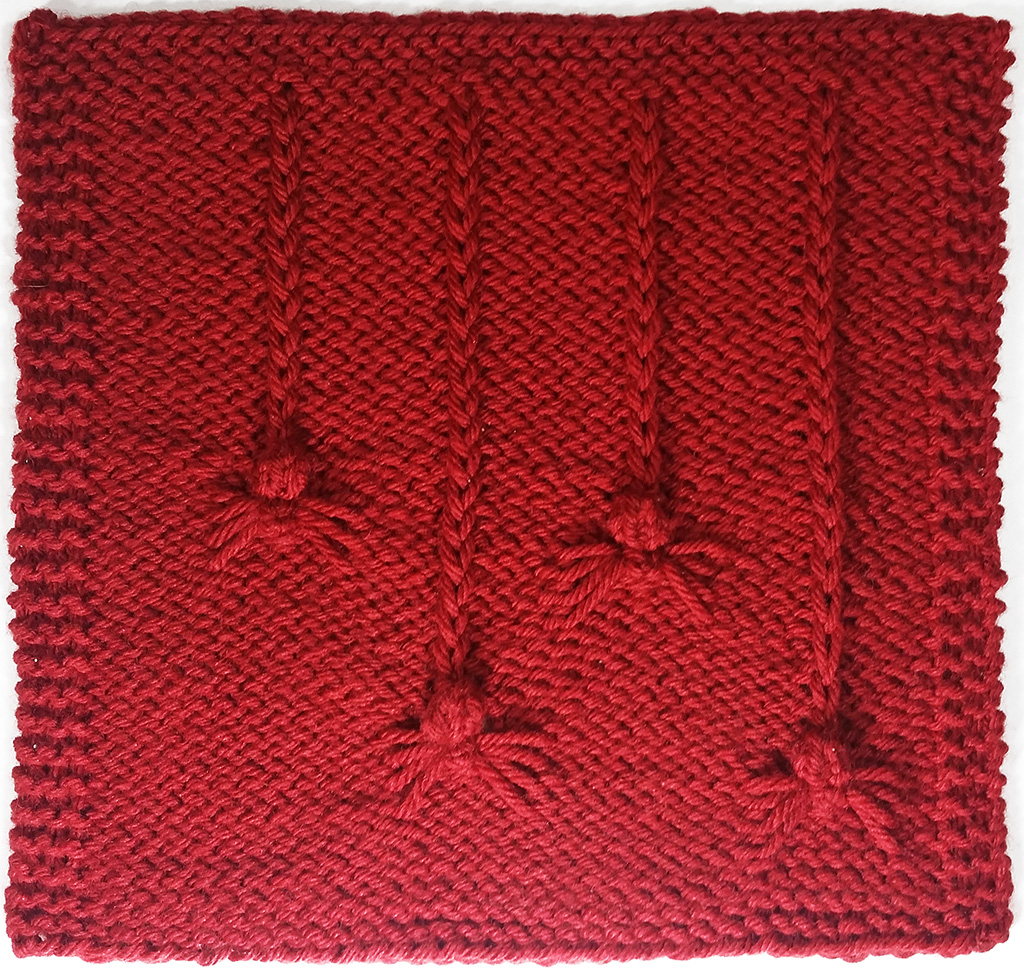
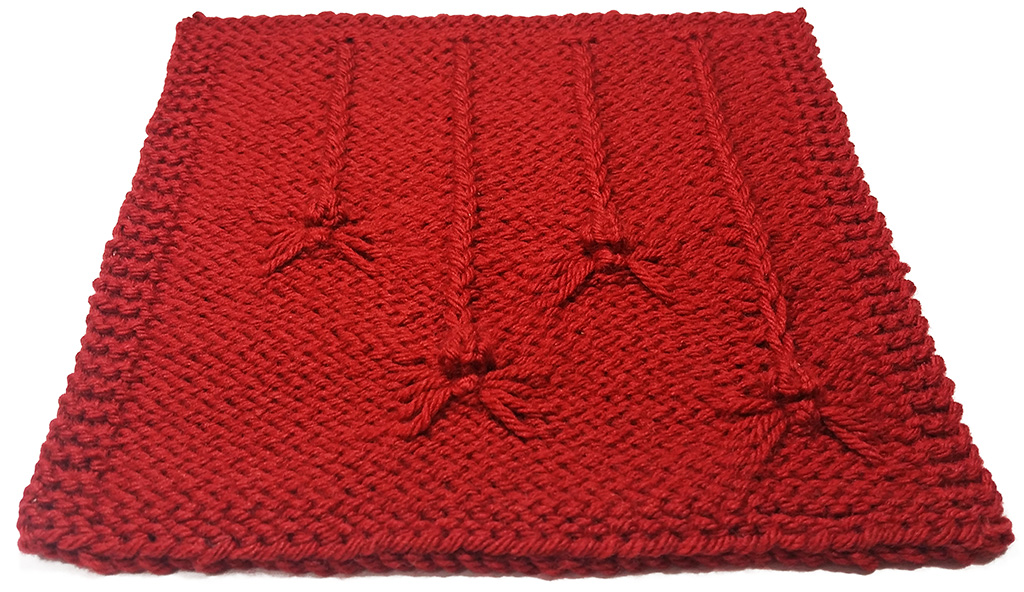
Dangling Spiders Square
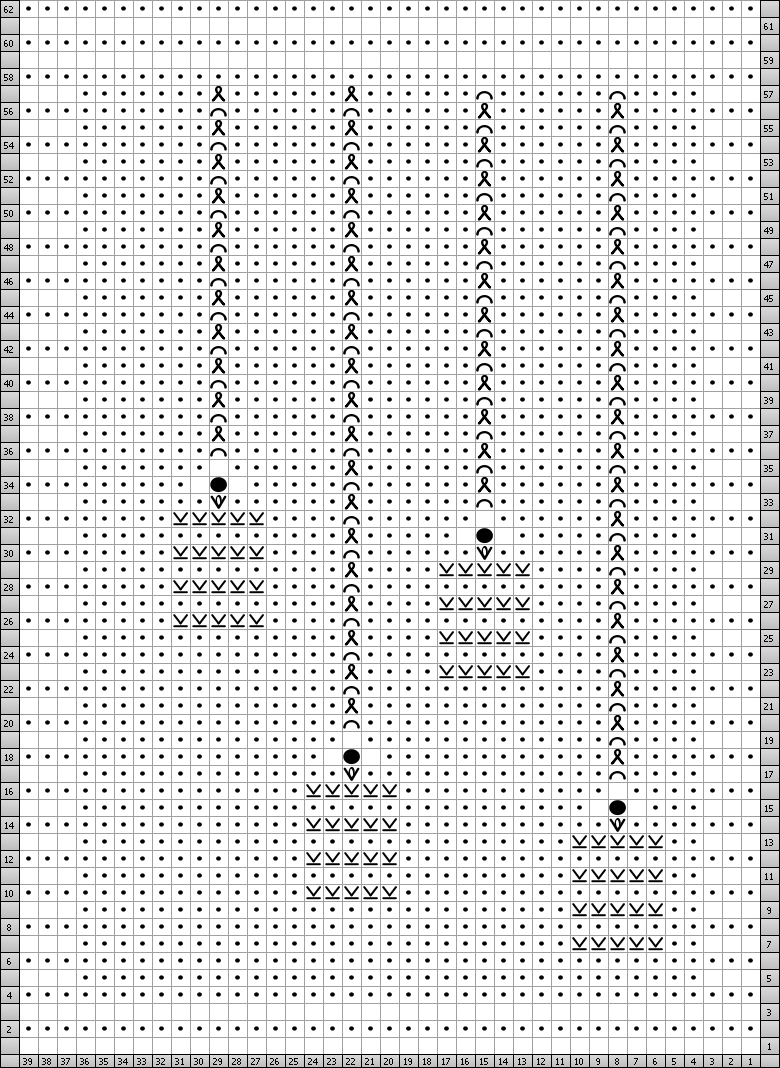
Work as a flat panel (Cast on from left to right/counter clockwise a total of 39 pegs. Begin 1st Row from right to left/clockwise):
Rows 1-4: Repeat the following 2 row pattern:
Row A: knit all sts.
Row B: purl all sts
Row 5: k3, p33, k3.
Row 6: purl all sts.
Row 7: k3, p2, (SWYF) x 5, p26, k3.
Row 8: purl all sts.
Row 9: Repeat Row 7.
Row 10: p15, (SWYF) x 5, p19.
Row 11: Repeat Row 7.
Row 12: Repeat Row 10.
Row 13: Repeat Row 7.
Row 14: p15, (SWYF) x 5, p11…
Peg 8 Breakdown:
- Temporarily remove the loop from peg 8 and hold.
- Carefully pull up all 4 strands of yarn travelling across the front of the work up onto peg 8 in order.
- Replace the held loop. There will now be 5 loops on peg 8, but ignore the 4 pulled up strands for now.
- EW peg 8 and KO the 2nd loop only (while ignoring the other 4). Repeat 2 more times to create a tiny bobble.
- Reach down at the back side of the work and pull up the loop from the stitch just below the first EW stitch and place it back onto peg 8. KO.
- KO the 4 pulled up loops.
…finish Row 14 with: p7.
Row 15: k3, p3, create bobble, p27, k3.
Row 16: Repeat Row 10, KO 2 over 1 on peg 8.
Row 17: k3, p4, s1, p13, repeat peg 8’s breakdown in Row 14 on peg 22, p14, k3.
Row 18: p16, create bobble, p12, EW1, p7.
Row 19: k3, p4, s1, p13, KO 2 over 1 on peg 22, p14, k3.
Row 20: p17, s1, p13, EW1, p7.
Row 21: k3, p4, s1, p13, EW1, p14, k3.
Row 22: Repeat Row 20.
 Row 23: k3, p4, s1, p4, (SWYF) x 5, p4, EW1, p14, k3.
Row 24: Repeat Row 20.
Row 25: Repeat Row 23.
Row 26: p8, (SWYF) x 5, p4, s1, p13, EW1, p7.
Row 27: Repeat Row 23.
Row 28: Repeat Row 26.
Row 29: Repeat Row 23.
Row 30: p8, (SWYF) x 5, p4, s1, p6, repeat peg 8’s breakdown in Row 14 on peg 15, p6, EW1, p7.
Row 31: k3, p4, s1, p5, create bobble, p5, EW1, p14, k3.
Row 32: Repeat Row 26, KO 2 over 1 on peg 15.
Row 33: k3, p4, s1, p6, s1, p6, EW1, p6, repeat peg 8’s breakdown in Row 14 on peg 29, p7, k3.
Row 34: p9, create bobble, p5, s1, p6, EW1, p6, EW1, p7.
Row 35: k3, p4, s1, p6, s1, p6, EW1, p6, KO 2 over 1 on peg 29, p7, k3.
Rows 36-57: Repeat the following 2 row pattern:
Row C: p10, s1, p6, s1, p6, EW1, p6, EW1, p7.
Row D: k3, p4, s1, p6, s1, p6, EW1, p6, EW1, p7, k3.
Rows 58-62: Repeat the following 2 row pattern:
Row E: purl all sts.
Row F: knit all sts
BO all stitches. Weave in ends close to work and block to an 8”x 8” measurement.
Have questions or comments? Please feel free to leave a message for Bethany in the comments below.


These are fantastic!! Thanks for posting this!!
Please Send pattern
Hi Jackie 🙂 The pattern is listed here at the blog. You could bookmark it for easy reference, or if you would like the pattern to print out or save to your computer, simply right click on it, then choose “select all”, then “copy”. You can then paste it into your own Word document. 😉
Do you think this pattern would work on a larger guage loom if i used bulky yarn?
Hi Roxanne 🙂
You can definitely use this pattern, or pretty much any other stitch pattern, on any loom, as long as the thickness of the yarn matches the gauge of the loom. 😀
this pattern is just awesome, thanks for sharing…
This is a.wonderful stitch!! I don’t know how to loom, but I am an avid knitter. Do you know how do this on needles?
Thank you so very much!
Janet.
Hi, Janet! 🙂 There are a couple projects with a similar stitch for needles on kitterly.com. You can find the link in the above post.
Excellent Idea! My 2 year old granddaughter is wary of “live” spider. But when she looks at them in photos or in a format of a toy, she is fine. May I borrow your design to knit her a sweater? I will make this on my knitting machine. Thank you.
Hi Andrea! Yes, of course you may use this design! I would love to see the completed sweater, too! 😀 (And I completely understand about your grandaughter’s spider phobia…that is how mine started too, lol!😜)
Pingback: Loom Knitting Patterns - My Recommendations - SHOP MEGA