
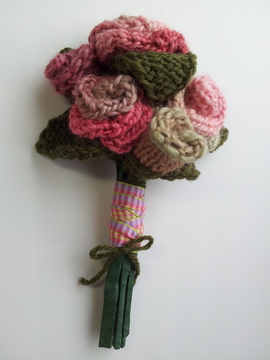
 We’ve recently been working on brightening up our Gettin’ It Pegged! Yahoo Group with loom knit flowers and sweet little hearts. I have worked up quite a lovely little bouquet using Brenda Myers’ Felted Roses pattern. I just wanted to share with you how I modified the pattern just a bit to be able to place a stem. 🙂
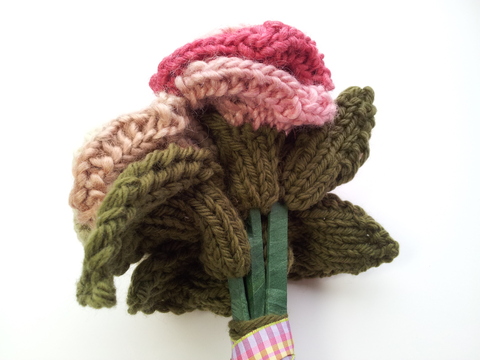
In the Brenda’s pattern, she describes how to create two leaves for each flower and then to stitch them on… which is fantastic for leaving the rose flat on a bag or pin, etc. Because I wanted the roses to stand individually, I did the following method to create that bottom green section that connects the flower to the stem…
 Loom: I used the smallest setting of the MS Loom (the two corner pieces used alone), and the large gauge pegs set every other one, so that there were 10 pegs on the loom. The same can be accomplished with a long Knifty Knitter Loom and Loom Clips.
- Drawstring CO all pegs in the round.
- Rows 1-6: flat knit all pegs (For my smaller buds, instructions found in the Felted Rosette Handbag, link below, I worked 5 rows)
- BBO the 10th peg by knitting the peg 1, moving the loop to peg 10, and KO. Move the loop back to peg 1. Peg 10 will now be empty. (For my smaller buds, on the last round, I began my BBO at peg 7 and continued to peg 10. This left 6 pegs with loops.)
- Follow Brenda’s direction exactly for creating the leaf…except that you will already be cast on, so no need to work the beginning step of a Drawstring CO. 😉 (For my smaller buds, I worked the same instructions, but using only the remaining 6 pegs and I only worked a total of 10 rows, rather than the called for 12.)
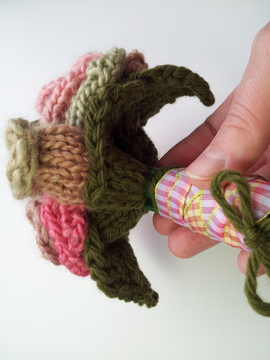
- Once your leaf is done and you have removed your greenery from the loom, place your stem (I used some popsicle sticks wrapped in floral tape, but a wrapped or painted dowel or wrapped wire would work as well.) up inside the cast on edge so that there is still enough room at the top opening to place the gathered bottom edge of the completed rose down into.
- Pull the CO tail snugly against the stem and knot. Do NOT cut!
- Thread the tail on a yarn needle and bring it invisibly up through the stitches to the top opening. Stitch around the opening to secure the rose in place.
- Weave in all ends.
- Enjoy!
 I think this method would also look really great with a Lily of the Valley type of flower, or an iris! 🙂 Hope you enjoy this little option for creating loomy gardens this spring!
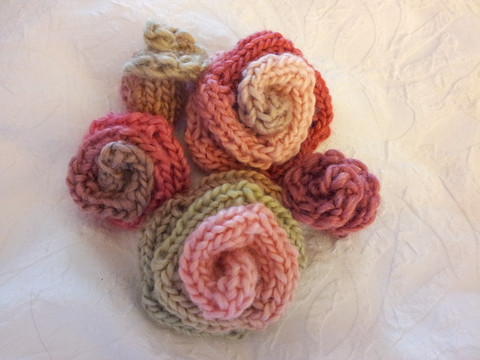 **Note about the different sizes of roses in the Bouquet: I used Brenda Myer’s Felted Rose pattern exactly for the larger two, then I used the same pattern with just 6 pegs for the smaller rose. The two rosebuds are created by using the same method as with the Felted Rosette Handbag (I used 16 pegs and worked 10 rows before using the Dereased BO) 🙂
Below are some of the bright and cheery patterns we’ve been using for our Loom Along, if you’d like to enjoy a little bit of early spring growing from your looms as well:
Felted Roses: http://loomlady.blogspot.com/2007/05/felted-roses.html
Felted Rosette: (video tutorial) https://gettinitpegged.com/twisted-stitches/
(written instructions included in Felted Rosette Handbag)
http://gettinitpegged.com/freebies/
Pansies: http://loomlady.blogspot.com/2011/03/pansies.html
Loopy Flowers: http://loomlady.blogspot.com/2012/06/lovely-loopy-flowers.html
Blooming Bookmarks, Lady Bug Pincushions, Shellies:
http://guppylovesshark.wordpress.com/free-patterns/
Little Loom Knit Hearts:
http://loomlady.blogspot.com/2012/02/little-loom-knit-hearts.html
Double Hearts:
http://loomlady.blogspot.com/2008/02/heres-my-heart.html
 Happy Heartfelt Looming!
Bethany~


Bethany this is the MOST perfect timing. I just finished 9 rose bodies using Brenda’s pattern … several are meant for pins but 2 are for a bud vase. I could never have figured this out for myself, but have been thinking about how to cover the bottom better …. now I’ll have the sweetest gifts. I only have a few leaves done, so don’t even have any frogging to do for the stand alone ones 🙂
Off to make the new leaves!
You are the best!
Terry S (Jersey Girl)
Oh, I’m so glad it’s such good timing for you, Terry! That’s so terrific! 😀
While you are getting ready for spring, we in SOUTH AFRICA, are preparing for winter. the roses are so lovely, must do them to brighten up the days ahead!!! Lovely, thank you
Lovely blog you hhave here