Sometime back, during one of my college classes, we were discussing the need to have something other than post-it notes to keep our places while knitting with charts. I’ve been mulling this little problem over in my mind ever since, constantly keeping an eye out for “just that perfect thing” that would be able to magically transform into a doable row marker.
Well, the other day I found it! Michaels now has small metal strips in their wood crafting aisle. Coupled together with magnet strips, this turned out to be just the ticket! Here’s how I made mine:

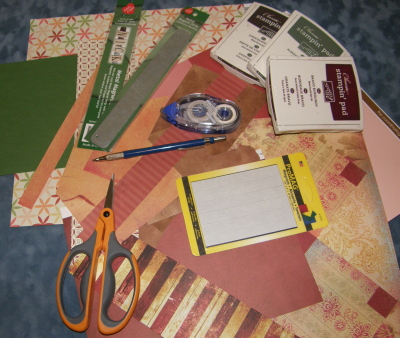
Gather:
-
your favorite paper bits and bobs leftover from scrapbooking/card making.
-
your favorite adhesive…needs to be strong!
-
pencil, scissors
-
ink pad to coordinate with paper, or antiquing brown
-
you might need some fine sandpaper
-
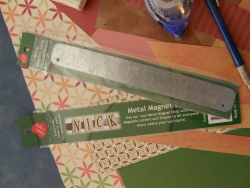
and these items below…2 metal strips & sticky backed magnets
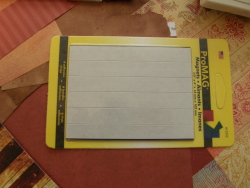
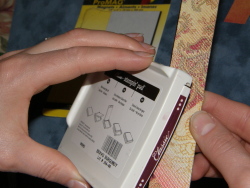
Step one: Trace around the metal strips with your pencil onto your decorative paper. Cut out.
Step two: Apply adhesive to the entire back of your cut out paper, remove the adhesive circle tabs from the back of the metal strips, and press the strips, back side down, onto the paper. The back sides of these are kind of rough, so I preferred to have them covered up. 🙂
Step three: Carefully press the sticky edges of the paper down onto the edges of the metal strips with your thumbs. If this isn’t working to keep them down, then you might want to use your sandpaper, and sand the edges of your strips, so that the extra paper overlapping them is whisked away.
Step four: On the back of the strip you intend for the back of your pattern, firmly apply the sticky side of two magnet strips end to end.
Step five: I love objects that are thoroughly antiqued. One of the easiest ways to do this is to add a little ink to the edges of your projects. It just seems to make them more interesting and dimensional. See the right hand photo below for how to do this easily.
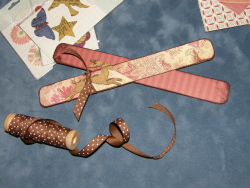 Step six: Embellish! I added a sweet little old fashioned wooden bunny, and some ribbon to mine. I thought that was perfect, since I’m Angora! 😉 But anything you like will do the trick…or you can leave it just your pretty paper. What ever you decide, this is the part that really makes this your marker…all your personal touches!
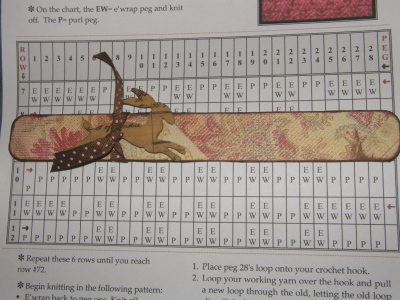 Now you’re ready for your most difficult to follow knitting chart! This won’t slip and slide, and you won’t have to worry about your sticky notes running out of stickum. It’s also great as a place marker in your favorite pattern book while travelling, etc. 😀
Hope you’ve enjoyed this little tutorial…happy chart reading!
Bethany~


Oooh, that’s really pretty! Thanks for sharing it. Have a great day!
Jenny
Fabulous idea! You are so smart.
Bethany,
This is a great idea. You really have a crafty mind and soul.
I loved the tutorial. I will have to read it back and back and back in order to find here in Mexico all the materials, or at least adapt them with something else. The magnet strips I do not think I will find them and cannot import them because of customs. I will find something else, but the idea is great!!!
Thank you for sharing.
Hugs
Maria
I have a set of these that I purchased years ago for cross stitching. Came with a metal board and long magnets to use. it’s really nice, but I haven’t used it in forever.
This beats the ole sticky note or the florescent green strip I hold together with paper clips 🙂
Thanks
maria,
many shower curtain liners have a round magnet in the bottom to cling to the sides of the tub. You could cut these out after you have used your curtain, and glue them to the metal strip. You know my sissors, knives, screwdrivers and so on get magnitized over time. The reason is that they are changing polarity when they are hit frequently. So you might try to hit the strip repeatedly, and see if you can make the strip magnitize itself. (sorry I don’t have great info on how to do it other than that!)
I also think a metal board to attach this to would be helpful. You can take the ‘tin’ that comes in rolls at the home centers for roofing and cover a clip board, or any other type board. I would probably use spray on adhesive and then weight it down until it was dry.
Where do you find the metal strips. I have found the magnet tape at my Joanne’s store but was wondering where you find the metal strips.
Thanks,
Elise
I love this idea, what if you used the large tongue depressors??, There is also a paint you can purchase that can be painted on a wall (or clip board) that magnets can hook too.
wonderful idea
Thanks
So, if I am reading this correctly, you only put magnets on ONE of the metal strips thereby being able to have them stick together through the paper….yes?
Yes, I’m sure that’s correct. 🙂 Then the opposite metal strip serves to give something for the magnet strip to “stick” to. I still use mine…very handy!
These are great and very helpful thank you. It reminds me of what my mother used in the early 90’s for her cross stitch patterns. Hers was also magnified to help her see the smaller patterns. Thanks again for posting this, brings back great memories 🙂
MARVELOUS IDEA!!
Just what I needed for my crazy complicated knitting patterns!
Teri
Oregon
Cool! 😀 I hope they still have those metal bars, as it’s been a while since this was written. But, if not, the idea is still sound and you should be able to find something suitable as a replacement. 😉 I love those knitting charts too!